")


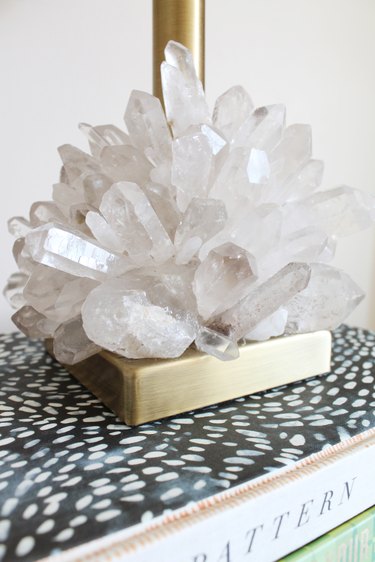
Have a basic lamp base you inherited from an old roommate or found thrifting? See it in a new light by dressing up a plain brass lamp base with raw crystal points to create a textural addition that will look great in any room in your home.
Video of the Day
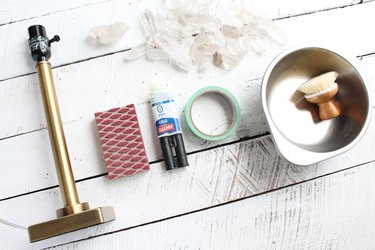
Things You’ll Need
-
4-5 pounds of quartz crystal points
-
Lamp base
-
Soap and water
-
Old toothbrush or scrub brush
-
80-grit sandpaper
-
Clear epoxy
-
Painter’s tape
When choosing a lamp base for this project, select one with a wide flat base and slender stem. Building your crystal formation will be easier around a straight cylinder surface, rather a decorative base with lots of curves.
When purchasing crystal points in bulk be sure to take note of the average size of the contents. You should purchase a range of sizes from 1/2-inch to 3-inches long to complete this project. Larger crystals will make up the base structure, while the smaller pieces will fill in the gaps and conceal the lamp base underneath.
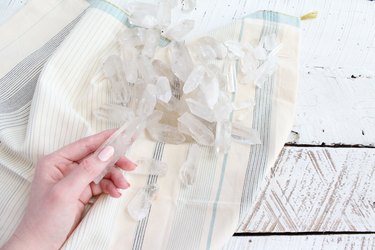
Step 1: Clean your crystal points
Scrub your crystals in a bowl of soapy water to remove dust, dirt and debris from the surface of the minerals. Rinse each piece clean and allow to dry completely on a towel. By removing these particles, you’re ensuring proper adhesion between crystals and the lamp base when applying the epoxy.

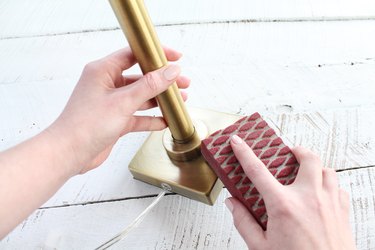
Step 2: Sand lamp base
Use an 80-grit piece of sandpaper or sanding block to scratch the surface around the base of the lamp to help the base layer of crystals to adhere when secured with the clear epoxy. Wipe away the dust with a damp rag and allow to dry before moving onto the next step.
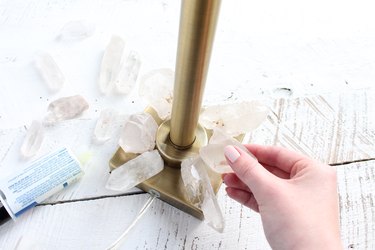
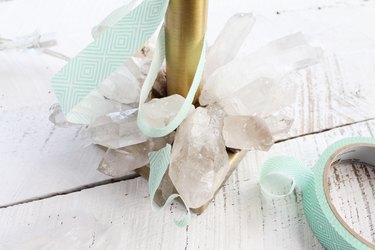
Step 3: Arrange and glue down first layer of crystals
Select the largest crystals for the first layer. These pieces will circle around the stem of the lamp and rest directly on the base of the lamp. Once you’re happy with their placement, apply a small amount of clear epoxy onto a flat side of the crystal and apply firmly to the lamp base.
Take care to follow the manufacturer’s instructions for mixing the epoxy, curing times and cleaning instructions. After the epoxy of your first layer has had its minimum set time, you may move onto building the next layer.
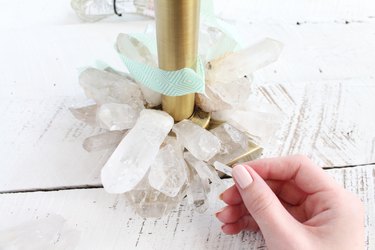
Step 4: Build up crystal formation around the lamp base
Sort your crystal pieces and test each one in different spots before securing with epoxy. Fitting and securing the remaining pieces of the crystal formation is a lot like assembling a 3-D puzzle. Each of the larger 2-inch or 3-inch long crystals should rest on one to two crystals below it, as well as touching the stem of the lamp.
You’ll find some crystal pieces fit and interlock naturally, so be sure to try each piece in a different spot or held at a different angle. Use painter’s tape to secure pieces in place while they dry. Allow each row or layer to dry before glueing on top of it to avoid pieces sliding out of place.
Tip
Rotate your lamp base as you work so that the front side isn’t the only view you have of your work. This way, the visual weight will be distributed evenly and you won’t have any sides that feel incomplete.
Step 5: Add smaller crystal points to fill in gaps
After all of your large pieces have cured overnight, gather all of the small 1/2-inch and 1-inch long crystal points to fill in the gaps between the larger crystals glued to the lamp base. Add a dot of epoxy to the ends of the crystals before sliding into place. Tape in place when needed. This step adds a naturalized look to the crystal formation and helps hide the metallic finish of the lamp base.
Step 6: Add a new lampshade, and style!
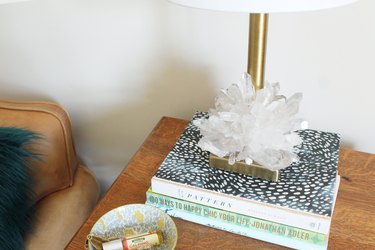
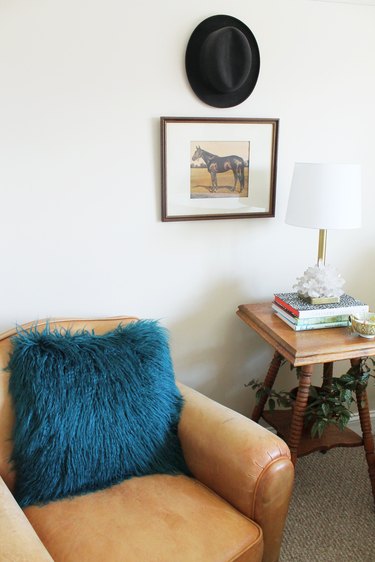
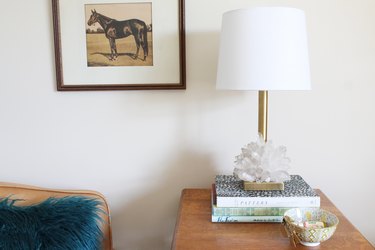
Place your finished lamp on a stack of your favorite books to add levels and visual interest to a bookshelf or table. Complete a pair of coordinating crystal lamp bases to place on bedside tables or behind your sofa on a console table!

If working with a shorter lamp base, skip the shade and select an Edison style bulb for a deconstructed look. Where would you style this cute lamp in your home? Let us know in the comments below!