")


Fall is upon us, which means spending more time indoors with loved ones and relaxing by the fire in a nice easy chair. Adding seasonal pillows and throws to cozy up your home doesn't have to be expensive or complicated. This DIY "gratitude" lumbar pillow can be made in just a couple hours and adds a thoughtful reminder that is not only appropriate as Thanksgiving approaches, but also year-round.

Video of the Day
Things You’ll Need
-
16-by-22-inch white cotton fabric, 2 pieces
-
Piece of scrap cardboard, approximately 11 inches by 17 inches
-
Printed "gratitude" graphic on 11-by-17-inch paper
-
Black pen or black fine-point fabric marker
-
Painter's tape (optional)
-
Black fabric paint
-
Paintbrushes, pointed round, very-fine and medium-fine thicknesses
-
Scrap fabric
-
Iron
-
White zipper, 16 inches long
-
Fabric pins (about 30)
-
Sewing machine
-
Zipper foot for sewing machine
-
Scissors
-
Lumbar pillow insert, 12 inches by 18 inches

Step 1: Trace the "Gratitude" Graphic Onto Fabric
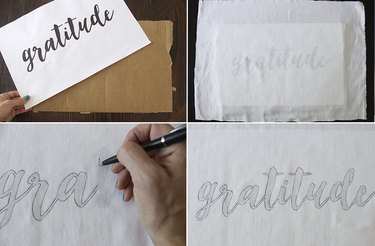
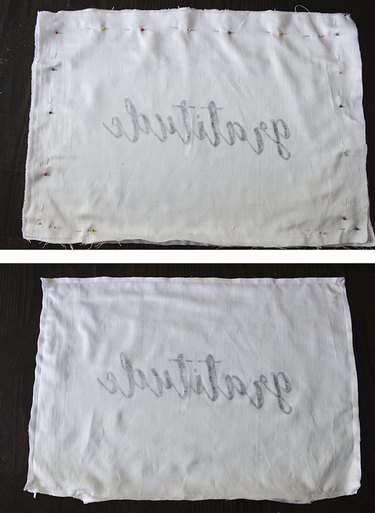
Download and print the "gratitude" graphic. Place the graphic on top of the cardboard, and then place a piece of the white cotton fabric right side up on top of the graphic. Smooth out any bumps, and measure to make sure the graphic is centered.
With a black pen or fine-point fabric marker, trace around the perimeter of each letter. As you trace, try to mark in the downward direction, so the fabric doesn't bubble up or move out of place. If preferred, use painter's tape to secure the fabric to the surface while you trace. When finished, remove the paper graphic so the fabric is sitting directly on top of the cardboard.
Tip
Take note that all fabric has two different sides, the right side that is the outward-facing side (generally smoother), and the wrong side, which faces in when wrapped around the bolt.
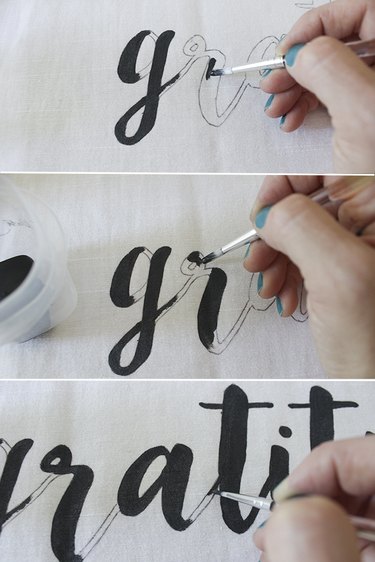
Step 2: Fill in Letters With Fabric Paint
Using the medium-fine thickness round point paintbrush, get a small amount of black fabric paint on the tip and start filling in between the traced lines on the thicker parts of the graphic only. Fill in the thinner lines with the very-fine thickness round point paintbrush to complete the graphic.
Tip
When painting fabric, since a brush is more flexible than a pen, you cannot move in "up and down" strokes like you normally would when coloring with a pen. Instead, make the strokes in a downward direction for greater control. Also, it is helpful to hold the brush in a near perpendicular position to the surface, instead of at an angle. This prevents the brush from slipping and going out of the lines.
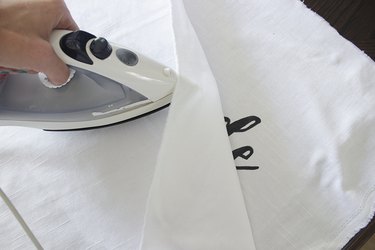
Step 3: Let Dry and Iron
Let the paint completely dry for one hour and retouch or add a second coat as desired. Once the fabric paint has dried for two to four hours, place a scrap piece of fabric on top of the painted fabric. With the iron set to the cotton setting, iron over the scrap fabric, moving over the entire graphic for two to three minutes. The heat will set the fabric paint. At this point you can wait 24 hours, then wash and dry the painted fabric (to soften the feel of the painted graphic), or you can go directly to the next step.
Step 4: Attach the Zipper
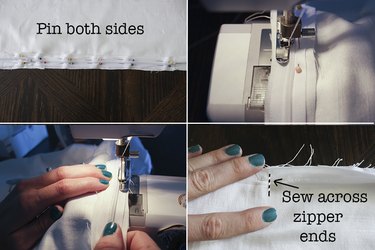
Place the painted graphic right side facing up on a flat surface. Place the other identical size piece of fabric on top, with the right side facing down or toward the graphic. Make sure all sides match up evenly.
Place the zipper along the bottom edge of the two fabric pieces. Pin both sides of the zipper to the fabric so that the top side of the zipper is pinned to the top piece of fabric and the bottom side of the zipper is pinned to the bottom piece of fabric. With a zipper foot attachment on your sewing machine, sew a straight line along one side of the zipper, removing the pins as you go. Repeat the process for the other side, moving the zipper foot to the other side as needed.
Secure both ends of the zipper with several stitches about 1/2 inch long, perpendicular to the zipper length. This prevents the zipper handle from sliding off and keeps both sides of the zipper aligned. Keep the zipper open before going on to the next step.
Step 5: Pin the Perimeter of Fabric and Sew
Starting at one end of the zipper, measure about 2 inches from the edge and pin along the perimeter of both pieces of fabric, making sure the pins are aligned. Sew along the edges, following the pin marks so that there is a 1 1/2 to 2-inch space along the entire perimeter. Once finished, trim the excess with fabric scissors so there is only 1/2-inch excess along the perimeter.
Step 6: Insert the Pillow Form
Through the open zipper at the bottom, turn the pillow case inside out and use the non-marking side of a pen or the point of a pair of scissors to push the corners out. Insert the lumbar pillow form and zip it closed.
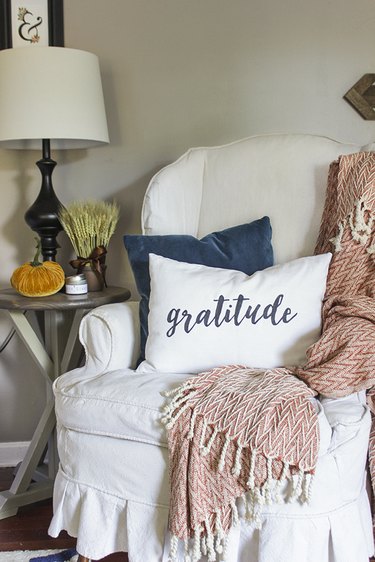
This pillow is a great size to be layered with other pillows, and because of its neutral color scheme, it would work well with nearly any decor. The graphic can be customized to create any word of your choice, but it is suggested to use a brush script calligraphy-type font to make a more artistic statement.