


")


Things You’ll Need
-
Tape measure
-
2-by-4 framing lumber
-
Chop saw
-
Framing nail gun
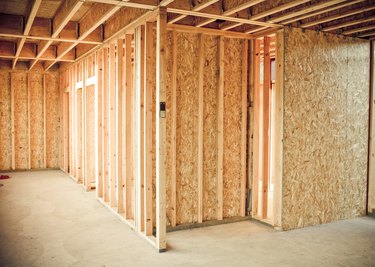 Walls parallel to joists usually require blocking to serve as a nailing surface. Image Credit: Hans Hansen/Lifesize/Getty Images
The special considerations involved in building a wall where joists are parallel include how to anchor the wall to the underside of the joists and how to provide a nailing surface for ceiling coverings along the wall's upper edge. The most common solution is installing short pieces of framing lumber, called blocking, perpendicular between the joists. The blocking provides a nailing surface for walls that fall between joists and serves as an evenly spaced fastening surface for finish materials, such as drywall. In some circumstances, the wall's top plate aligns with a parallel joist, which provides an anchorage surface, but still requires blocking to accommodate ceiling drywall.
Video of the Day
Wall Beneath Joist
Step 1
Measure the height between the floor and the bottom edge of the joist. Use a circular saw to cut a top and bottom plate to the desired length of the wall from 2-by-4 lumber. Cut studs to the measured height minus the thickness of the top and bottom plate. Divide the wall's length in inches by 16 and round up to determine the number of studs for a standard 16-inch spacing.
Step 2
Align the plates' ends, press them face to face and lay out stud locations along the plates' edges; a stud at each end and every 16 inches between. Assemble the wall on the ground, sandwiching the studs between the plates, with two nails through the plates' faces at each of the studs' ends.
Step 3
Tilt the wall onto its bottom plate and hoist it upright. Align the wall's top plate directly beneath the parallel joist's bottom edge. Plumb the wall and anchor the wall to the joist and subfloor with the nail gun. Space nails at least 24 inches on center or according to local requirements.
Step 4
Cut two pieces of 2-by-4 to the length of the wall's top plate; these pieces will lay atop the wall and provide nailing for ceiling drywall. Lay a piece face down on top of the wall's top plate at either side of the joist, butting their edges against the joist's opposing faces. Align the boards' ends with the ends of the wall. Fasten the boards to the top plate with the nail gun, spacing nails approximately every 24 inches. If your gun is loaded with 16d nails, reduce the nail size to prevent sharp ends from protruding into the wall's cavity.
Wall Between Joists
Step 1
Measure the distance between the joists. Divide the proposed length of the wall by 24 inches to determine the required amount of blocks; round up the result to obtain a final figure. Use the chop saw to cut the required number of blocks to length from pieces of 2-by-4 framing lumber.
Step 2
Align the blocks perpendicular between the joists, faces flush with the joists' bottom edges. Use a framing nail gun to drive nails through the outer faces of the joists and into the ends of the blocks. Install blocks at least every 24 inches on center along the proposed length of the wall.
Step 3
Cut the wall's top and bottom plate according to the desired overall length of the wall. Cut studs to the height between the floor and bottom edge of the joists minus the thickness of the top and bottom plate. Lay out stud installation locations at each end of the top and bottom plates and every 16 inches on center across the field.
Step 4
Assemble the wall on the ground, sandwiching studs between the plates and fastening the studs to the plates with two framing nails at each end. Tilt the wall on its bottom plate and lift the wall upright. Align the wall in its desired position between the parallel joists, snugging its top plate flush against the blocking.
Step 5
Anchor the wall to the blocking by driving framing nails through the bottom face of the top plate and into the blocking. Check the wall's alignment and anchor the wall to the floor by driving framing nails through the exposed face of the bottom plate and into subfloor framing.
Tip
Clamp a scrap board to your chop saw's fence to create a simple jig that allows you to quickly cut blocking to length. If the wall's bottom plate falls between joists, use a similar method of blocking to provide anchorage to the subfloor. For a wall directly beneath a joist, you can save lumber by mounting small lengths of blocking to the top plate at 24-inch intervals instead of a full length plank.
Warning
Discuss your materials and design decisions with your building department to maintain code compliance. Use approved fasteners to anchor walls to concrete floors; consult your building authority for details.


